Get an Early Start on Holiday Prep: Homemade Decoupage Ornaments

It's already the third week of November, friends! Meaning the holidays are creeping up on us fast. Time to get those creative holiday juices flowing!
Last weekend my 4 year old son and I decided to make some holiday gifts for friends and family. We love little projects like this, as we get to spend some QT together, practice some of our little motor skills (one of us needs a bit more practice than the other!), and hopefully even save some money on holiday gifts. I like to think it also helps him understand that the holidays are about more than shopping and consumerism...
Once I realized felting, well felting needles in particular, isn't a great idea for an energetic little guy like my son, we settled on homemade decoupage holiday ornaments. These are essentially ornaments with all sorts of pretty paper / photos / graphics applied to them... check out some examples to the right.
 Some of our creations!
This is a fairly intuitive craft, and it's really easy. My four-year old had a good time helping out, and he was able to do most parts of this project.
Here's what you'll need:
- Ornaments to decorate. You can use old glass ornaments, or buy some at your local dollar store. You're covering them with paper and photos, so it doesn't really matter what they look like.
- White glue or Mod Podge. If you haven't yet explored the world of Mod Podge, this is a good time to start. It's something of a miracle glue / sealer, useful for pretty
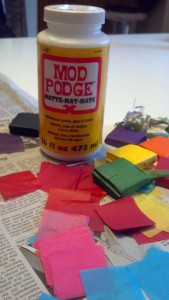 If you haven't heard of Mod Podge yet... it's time you did!
much any craft project. It's a little expensive, so a glue mixture (2 parts glue : 1 part water) will work well too.
- Colored paper. I used tissue paper squares I bought at a local craft store. You can just as easily cut up tissue or other paper you already have around the house.
- Brushes.
- Pictures / graphics / stickers. The fun thing about decoupage is you can use almost anything. You can print photos of your family to add to the balls, old-timey holiday graphics, printed quotes, etc. One of my favorites is using pieces of holiday wrapping paper (be careful about this one if there's the possibility of your kids recognizing the paper later on!). The possibilities are endless. Try googling "decoupage holiday ornaments" and you'll find a ton of ideas online too.
- Newspaper for the table, cup of water for your brushes, and paper towel for blotting brushes.
- Someplace to let your ornaments dry, like an egg carton.

Step 1: Prep your paper. Decide what papers you want to use, and tear them into smallish pieces. Remember you'll be wrapping these around your balls, so if they're really big they'll get all crinkly with the curve of the ball. That can look really nice, but smaller pieces will be a bit more manageable. Little hands are also great at tearing paper into strips!
 Applying glue or Mod Podge to the ornament.
Step 2: Prep your ornaments. Remove the toppers to the ornaments if you can, and store them in a safe place. Make sure to keep all of the ornaments someplace where they can't easily roll off the table either! My son managed to body-slam the table more than once, but thankfully we only lost one ornament (could have been much worse!).
Step 3: Apply your glue, or Mod Podge. Apply a decent coating of glue to the ornament. I found it easiest to stick my finger in the topper opening, so I could easily paint the glue all of the way around.
Step 4: Apply your paper! The fun part! We got pretty crazy sticking different papers on our ornaments. Be sure to smooth them down occasionally with the back end of the paint brush.
 Applying tissue paper to the back of our ornament.
Step 5: Apply glue on top of the paper. Apply the glue once again on top of the paper you've just applied. This will give it a nice coating, and ensure that it sticks to the ornament.
Step 6: Set the ornament up some place to dry.
 Remember to apply another coat of glue, after you apply the paper!
Step 7: Reapply coats of paper and glue, if you like. We used tissue paper, so it was quite thin. We applied a second coat of paper a few hours later. This isn't really necessary, in particular if you're using a thicker paper to start with. But will give the ornaments a deeper color / look.
Step 8: Dry again!
Step 9: Apply final touches. It can be really fun to apply sequins, stickers, paint, etc. to your ornaments once you're done applying the paper. Keep in mind you'll probably want to apply another final layer of glue / Mod Podge on these as well.
 We really liked using wrapping paper too!
Step 10: Try not to break, and enjoy! All in all, we spent about $2/ornament on these, because I bought a big bottle of Mod Podge (which will last me a long, long time) and some new ornaments. But I think you could definitely do it for much less, as you likely have most of this around the house already.
Enjoy! Happy holidays!
 More finished ornaments in the design my son picked out. He calls this "rainbow"!
The views and opinions expressed in this post are those of the author(s) and do not necessarily reflect those of MomsRising.org.
MomsRising.org strongly encourages our readers to post comments in response to blog posts. We value diversity of opinions and perspectives. Our goals for this space are to be educational, thought-provoking, and respectful. So we actively moderate comments and we reserve the right to edit or remove comments that undermine these goals. Thanks!